Hi @radu,
It’s hard to make an exact working solution as we are unaware of your current flow and how it currently works. And by that, I mean how you retrieve and store the image and how that image would then be loaded to convert it to a PDF.
I have taken the approach where you will add a code piece between the steps after you have your image from the email. (Note: This also assumes that the image is a URL format).
So, in the code piece, you will need to do the following steps:
Step 1. Setting up our Key/Value Pairs
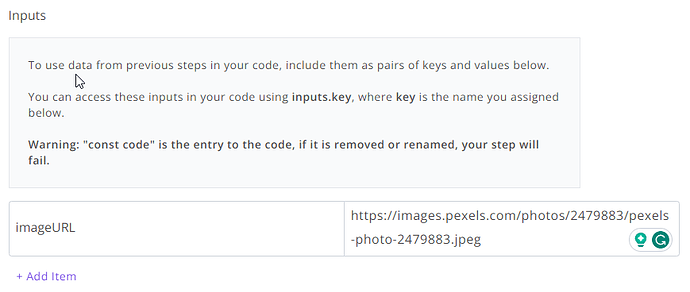
At the top, you will see two input boxes for Key and Value. We will use these to reference the image URL that is returned after you fetch it from your email.
You will need to input the following details:
- Key:
imageURL(Note: We can name this whatever we want; I have gone withimageURLto make it clear for this example. We will use this in our code to reference the image URL) - Value:
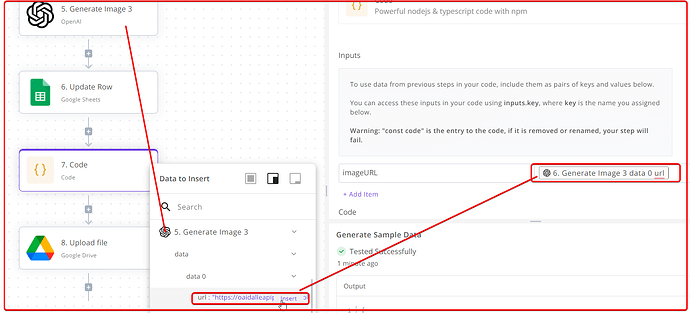
https://images.pexels.com/photos/2479883/pexels-photo-2479883.jpeg(Note: I have used a direct placeholder image URL in my instance. You would likely select the previous piece and the result that stores the fetched image. See the below image for an example of what I mean by this.)
So this would relate to whatever piece you use to fetch/store/retrieve the image URL from the email.
Step 2. Adding our NPM Packages:
Next, we need to rely on a few NPM (node) packages to do some of the heavy lifting for us. So we are going to need to install a few.
axios(version 1.6.2): A promise-based HTTP client for making HTTP requests, used in the code to fetch the image from a URL.pdfkit(version 0.14.0): A PDF generation library used to create and manipulate PDF files in the code.
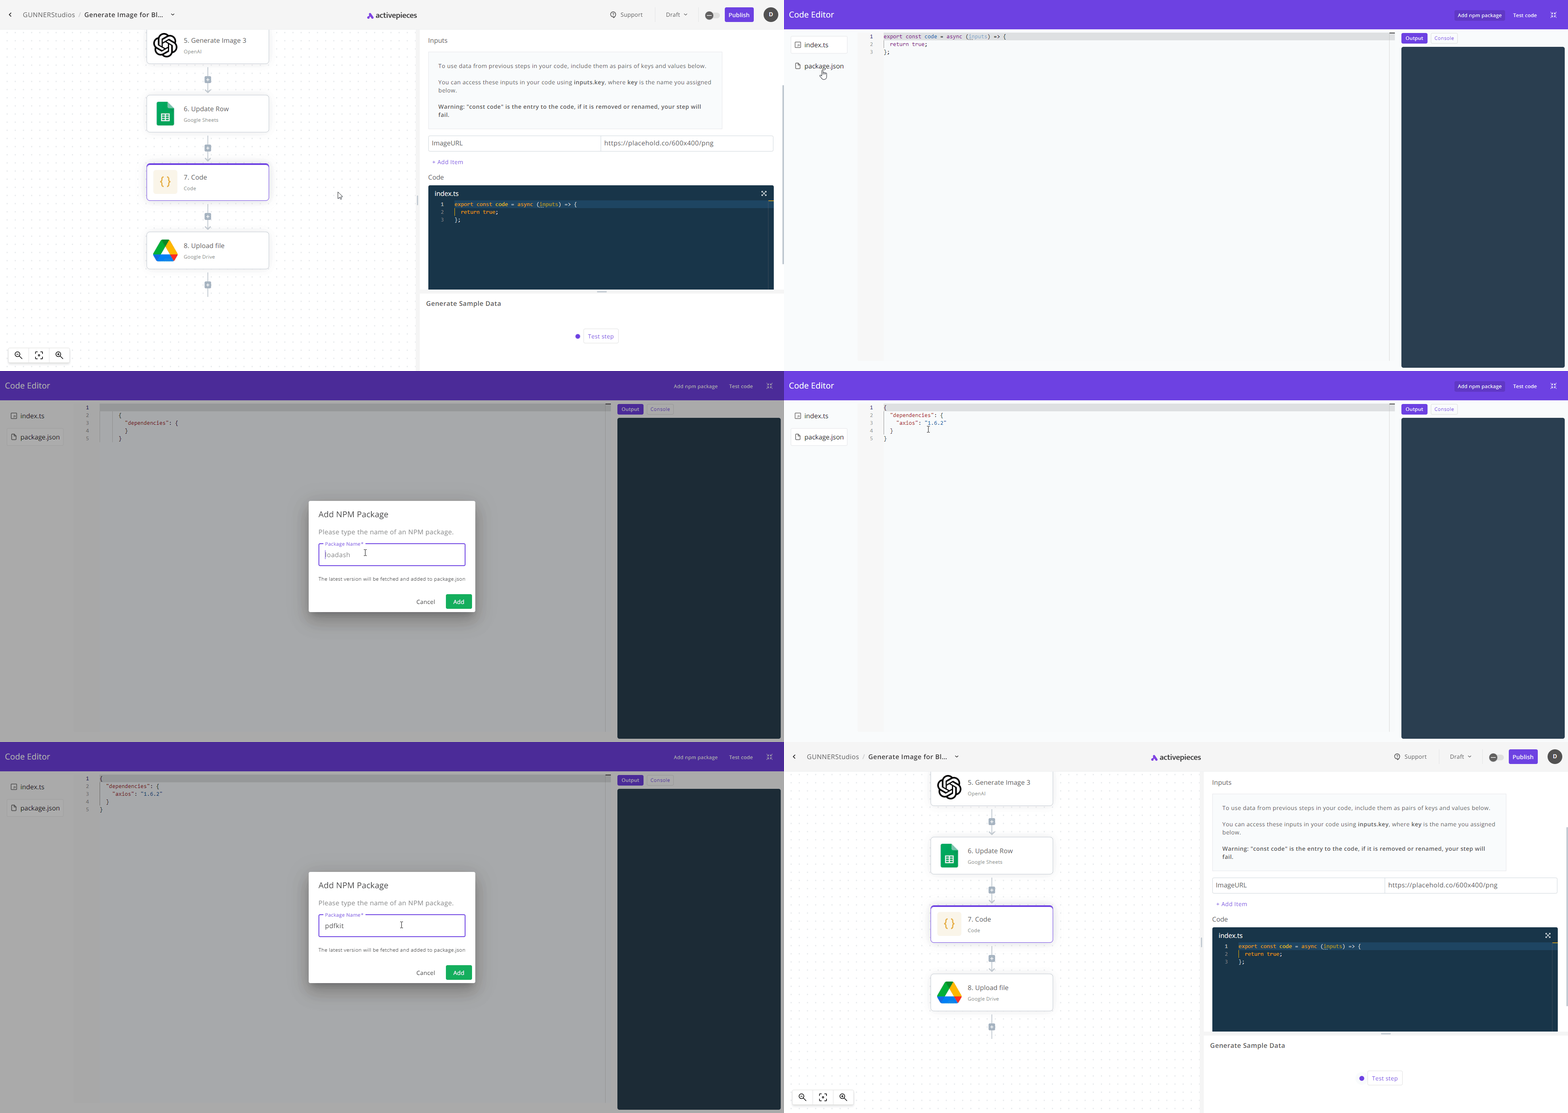
Your package.json should look like the following for reference:
{
  "dependencies": {
    "axios": "1.6.2",
    "pdfkit": "0.14.0"
  }
}
Step 3. Adding our Code:
Next, you will need to add the following code into the main code window. I have added heavy code comments so you can see what each part does, as well as a more thorough explanation below the code:
// Importing necessary Node.js modules
const axios = require('axios'); // Used for making HTTP requests
const PDFDocument = require('pdfkit'); // Library for creating PDF documents
const fs = require('fs'); // File system module for file operations
const { promisify } = require('util'); // To convert callback-based functions to promises
const stream = require('stream'); // To handle Node.js streams

// Converting stream.finished to a promise for better async handling
const finished = promisify(stream.finished);

// The main asynchronous function that will be exported
export const code = async (inputs) => {
  // Accessing the image URL from the inputs with the key 'imageURL'
  let imageUrl = inputs.imageURL;

  // Checking if the imageUrl is properly defined
  if (!imageUrl) {
    throw new Error('Image URL is undefined or invalid');
  }

  // Defining the output path for the PDF file
  let outputPDFPath = 'output.pdf';

  // Fetching the image from the URL using Axios
  // The response is expected in 'arraybuffer' format suitable for binary data
  let response = await axios.get(imageUrl, { responseType: 'arraybuffer' });
  // If the request is not successful, throw an error
  if (response.status !== 200) {
    throw new Error(`Failed to fetch image: ${response.statusText}`);
  }
  // Converting the response data to a binary buffer
  let imageBuffer = Buffer.from(response.data, 'binary');

  // Creating a new PDF document using PDFKit
  const doc = new PDFDocument();
  // Creating a write stream to write the PDF data to a file
  const stream = fs.createWriteStream(outputPDFPath);
  // Piping the PDF document data into the file stream
  doc.pipe(stream);

  // Adding the image to the PDF document
  // PDFKit will automatically scale large images to fit the page
  doc.image(imageBuffer, {
    // Uncomment the line below to set dimensions in 'fit' to manually specify the image size
    //fit: [800, 600],
    align: 'center', // Centre-align the image
    valign: 'center' // Vertically centre-align the image
  });

  // Finalising the PDF document and ending the data stream
  doc.end();

  // Waiting for the PDF writing process to finish
  await finished(stream);

  // Reading the created PDF file into a buffer
  let pdfBuffer = fs.readFileSync(outputPDFPath);
  // Converting the PDF buffer into a base64-encoded string
  let pdfBase64 = pdfBuffer.toString('base64');

  // Returning the base64-encoded PDF data with the MIME type prefix
  return { pdfBase64: `data:application/pdf;base64,${pdfBase64}` };
};
In this code:
Axios: Used to fetch the image from the provided URL. This operation is performed with the arraybuffer response type, suitable for binary data like images.
Buffer Conversion: The response data from the Axios request is converted into a buffer (Buffer.from(response.data, 'binary')). This buffer is necessary for PDFKit to process the image.
PDF Creation with PDFKit: A new PDF document is created using PDFKit. The image is then added to this document. The fit option is omitted, allowing PDFKit to automatically scale the image to fit the page, if necessary. This simplifies the process and avoids the need for explicit size calculations.
If you want to specify the dimensions manually, you could supply the fit dimensions like so:
// Add the image to the PDF from the buffer
doc.image(imageBuffer, {
  fit: [250, 300],
  align: 'center',
  valign: 'center'
});
NOTE: In PDFKit, when adding an image to a PDF document, you can use several alignment options to position the image within the page. For the align and valign properties in the doc.image function, you have the following options:
-
align:
'center': Centres the image horizontally within the page.'left': Aligns the image to the left margin of the page.'right': Aligns the image to the right margin of the page.
-
valign:
'center': Centres the image vertically within the page.'top': Aligns the image to the top margin of the page.'bottom': Aligns the image to the bottom margin of the page.
Using these options, you can control where the image is placed on the page. For example:
doc.image(imageBuffer, {
  fit: [800, 600],
  align: 'center', // This will centre the image horizontally
  valign: 'center' // This will centre the image vertically
});
In this code, the image will be centred both horizontally and vertically on the page. You can adjust these settings based on your layout needs. For instance, if you want the image to be at the top right of the page, you would use align: 'right' and valign: 'top', etc.
Finalising the PDF: After adding the image, the PDF document is finalised (doc.end()). The stream to which the PDF is written is monitored using the finished function (converted to a promise for better async handling). This ensures the code waits until the PDF writing process is completely finished.
Base64 Encoding: The PDF file is read back into a buffer (fs.readFileSync(outputPDFPath)) and converted into a base64-encoded string. This encoding is necessary because the system expects the PDF in this format.
Output: The base64-encoded string, prepended with the appropriate MIME type (data:application/pdf;base64,), is returned. This format is ready for use wherever required in your application or workflow.
This code provides a streamlined approach to adding an image to a PDF without explicitly managing image dimensions. It relies on PDFKit’s ability to handle various image sizes efficiently.
IMPORTANT:
-
The line
let imageUrl = inputs.imageURL;refers to theKey/Valuepair set in Step 1. If you named this differently (e.g.,imageURL), you will need to update any/all instances of this in the code. -
The line
let outputPDFPath = 'output.pdf';will name every PDF fileoutput.pdf. To ensure each filename is unique, consider adding a timestamp to the filename. This way, each file will have a unique name based on the exact time it was created. For example:
let timestamp = new Date().toISOString().replace(/[-:.T]/g, '').slice(0, 14);
let outputPDFPath = `output-${timestamp}.pdf`;
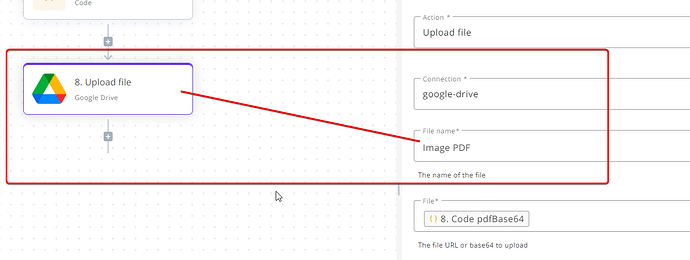
This won’t really matter if you are outputting one PDF at a time as ultimately, if you are following this step, with a step like using a Google Drive piece to output the PDF to Google Drive, then you can specify the name in the Google Drive piece directly, which will be the final PDF output name.
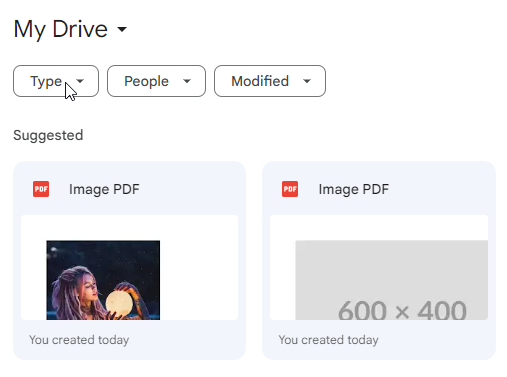
Lastly, here is a screenshot showing that the images have been successfully converted to PDF and output to my Google Drive folder:
Sorry for the lengthy post; hopefully, this will get you the desired results. I have provided the URLs for the images I used in this example below:
Placeholder Images Used for Testing
https://placehold.co/600x400/png
https://images.pexels.com/photos/2479883/pexels-photo-2479883.jpeg
Kind regards,
GunnerJnr

